In our family Kelli’s Dad has a huge love of all things patriotic, especially those relating to the Veterans and active members of the military. He devotes countless hours to the local Veteran’s groups, holds positions in the Polish Legion of American Veterans, runs the local Poppy Drive, is a member of the Color Guard and volunteers at the local Veteran’s hospital.
You get it right, he is a very proud American.
He is also celebrating a birthday soon and we wanted to make him something special for him to enjoy. We saw a few different projects for yard signs that had an Americana theme but nothing seemed just perfect…until we saw a flag made out of a wooden pallet. Perfect! He has a large wooded area on his property that backs up to a nature trail where he proudly displays a tall wooden Uncle Sam. A large flag is just what he needs to finish off the scene!
This project was fairly easy to do, and because we always have paints on hand and pallets too it was virtually free! (Mr. TCC loves to reclaim any useful pieces of wood, including pallets, he can find).
DIY American Flag – Reclaimed Pallet Wood
Items you will need:
1 pallet (any size works) – call your local hardware store or furniture store; they often have pallets they will give away. Make sure the boards are secure, and we opted for a pallet with boards quite close together.
Yardstick
Pencil
Red, white and blue paint (we used outdoor latex paints)
Sponge
Scissors
Clear acrylic spray (optional)

- Lay your pallet out flat and determine what will be your top and bottom. Instead of working on the ground we recommend putting the pallet up on two saw horses or a table.

- Paint the top of the pallet white and allow it to dry. If you like things to look more finished then you can paint the entire pallet, but we preferred for the back and sides to remain natural wood.

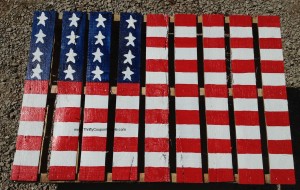
- Using a yard stick and pencil, mark off 13 equal stripes on the pallet. There are 13 stripes on our flag. We had a pallet that was 40″ x 36″, so each stripe ended up being 3″ tall.
- Mark off the rectangle of the flag that will be blue. This section should be just under half the width of your flag and just about half of the length. (We ended up with a 20″ wide x 18″ section). This area does not have to be precise, but you want to be sure you will have the right proportions to reflect that of a real flag.


- Once you have all your lines drawn, it is time to paint. Start with red and paint your red stripes. As you can see in the photo, we put a light “X” on the stripes that will be red when we laid out the lines to avoid any accidental mix ups with the paint.

- Once the red paint has dried, paint the blue rectangle and allow that to dry.

- Using scissors or a knife, cut a sponge into a star shape. We used a kitchen sink sponge and cut the star about 2″ x 2″. This is the star you will use to “stamp” on your stars.
- Pour a small amount of white paint onto a paper plate, plastic lid or something similar. Gently dip the star shaped sponge into the paint, dabbing off any extra. Apply the sponge with the paint to the navy blue section of the flag, using slight pressure and making sure the tips come into contact with the area. When applying the stars be sure to work in a straight line, and do not rush. We did not attempt to fit the correct number of stars onto our flag; we were going for the overall finished concept – not 100% accuracy. You could also hand paint the stars if you wish, or use a stencil. It is up to you, but the sponge method worked well for us.
- Using the white paint and a small craft brush, touch up the corners of the stars if needed.
- Allow it all to dry well and spray the finished project with a clear coat of acrylic spray sealer to protect it from the weather

What do you think? We went ahead and made 3 at one time, one for Dad, one for a gift for another family member and one for ourselves. To mount it you can attach it to a tree or a post.


This is so incredibly creative…perfect for summer! This would be perfect to link up to my Create It Thursday post..it’s live now! http://www.lambertslately.com/2013/06/create-it-thursday-5-plus-features.html
Love this! Thanks for sharing!
LOVE THIS! WILL YOU LINK UP TO MY FAVORITE FRIDAY PARTY:http://imnotatrophywife.com/2013/06/favorite-friday-party-27-june-7-2013-i-am-not-a-trophy-wife.html